Creating the Alert
Accessing Alerting extension
Step 1. Open Qlik Sense application: Launch your Qlik Sense application where you want to work with the Alerting Extension.
Step 2. Enter edit mode: Navigate to the sheet or create a new sheet where you plan to use the Sheet Controller. Enter the edit mode to make changes to the sheet.
Step 3. Access custom objects: In the left panel, click on "Custom Objects" to open the custom objects menu.
Step 4. Select SenseOps extension: Locate and select "SenseOps" from the custom objects menu.
Step 5. Add SenseOps Alerting extension: Find the "SenseOps Alerting Extension" extension within the SenseOps category. Click and hold the Alerting Extension, then drag and drop it onto the sheet canvas. This empowers your Qlik Sense Alerting setup with more flexibility, automation, and control.
Creation page
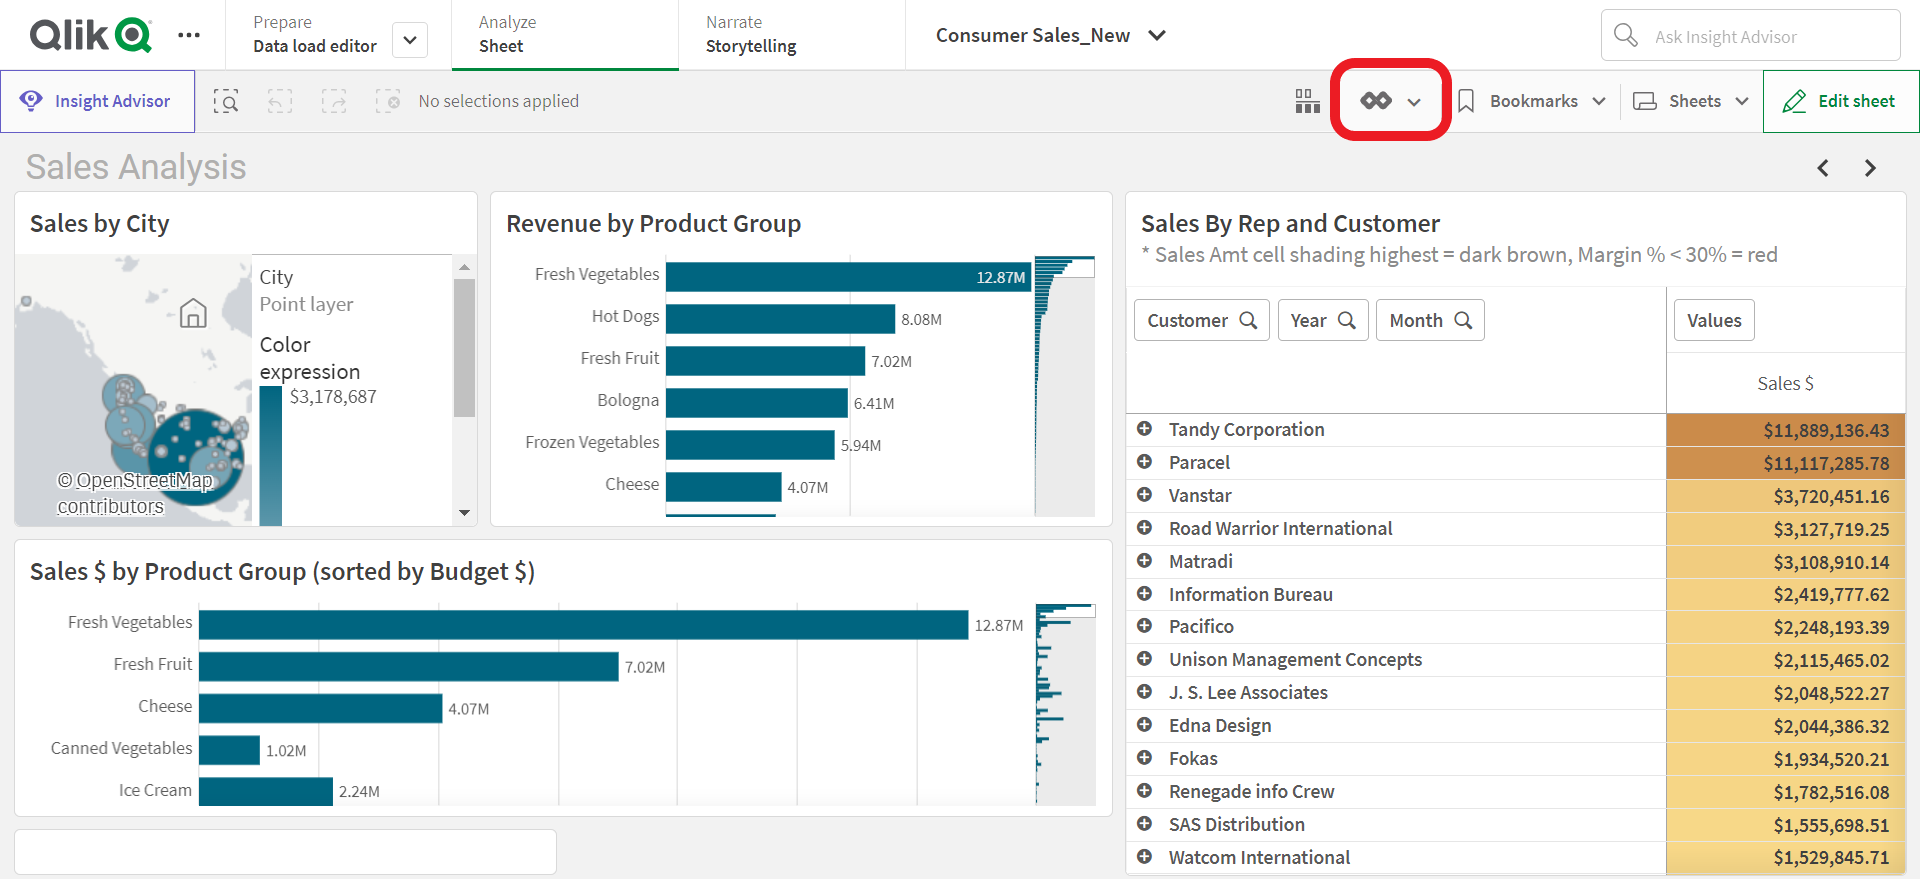
Step 1: To access Senseops Alerting, Click the Alert icon in sheet, as shown below.
Step 2: The Alerting slider screen will appear. Click the (+) Create Alert button to begin creating a new alert.
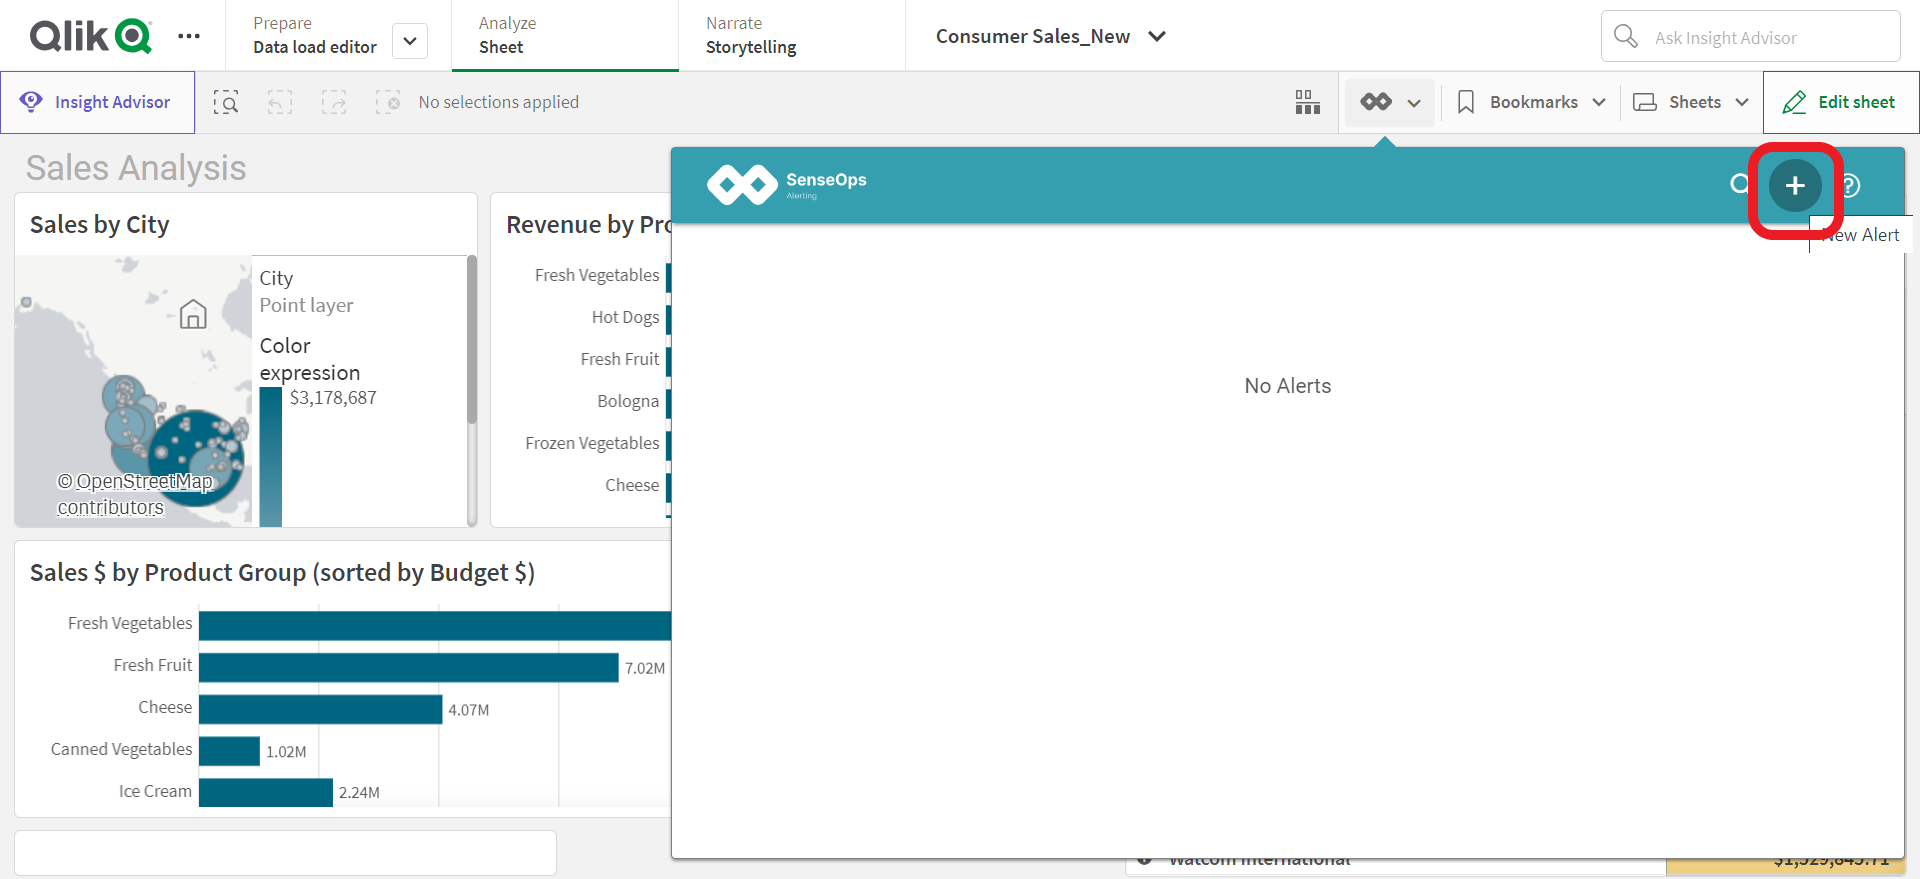
- Already alerts exists, then click the (+) Create Alert button, present in the top right corner of page.

Step 3: Once the (+) Create Alert button is clicked, the slider will reload, and the Alert creation pop-up will appear, as shown below.
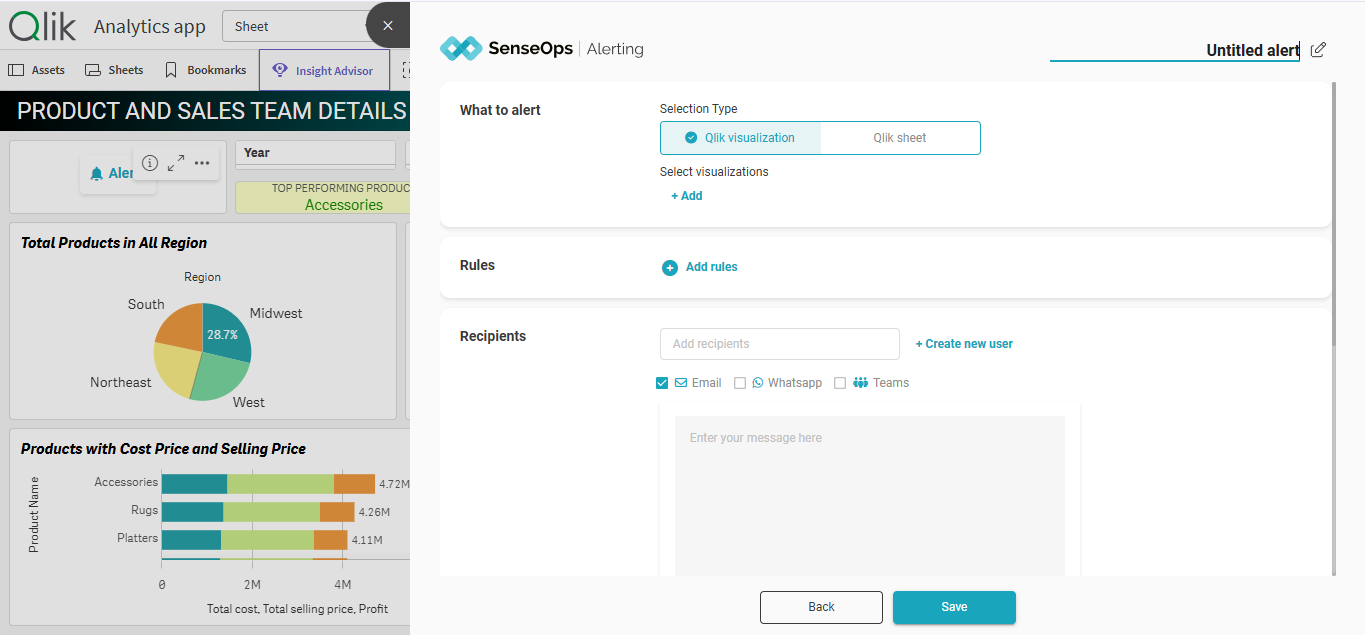
Step 4: In the top-right corner of the slider, enter the desired name for the alert.

Selecting the Qlik Sense Alerting Type in SenseOps
Choose the appropriate alert type to monitor your data effectively using SenseOps Alerting, built to enhance Qlik Sense Alerting workflows. Whether you're setting up threshold-based alerts, anomaly detection, or custom conditions, selecting the right alert type ensures timely and relevant notifications within your Qlik Sense environment.
Step 5: Select the Alert type as either Qlik Visualisation or Qlik Sheet, then choose the specific visualizations or sheets from the + Add button below.

Step 6: You can either select a bookmark filter or enable the current filter, as shown below.

- You can maximize the charts uploaded for alert and also can delete the charts, if not required.

Adding Qlik Sense Alerting Rules in SenseOps
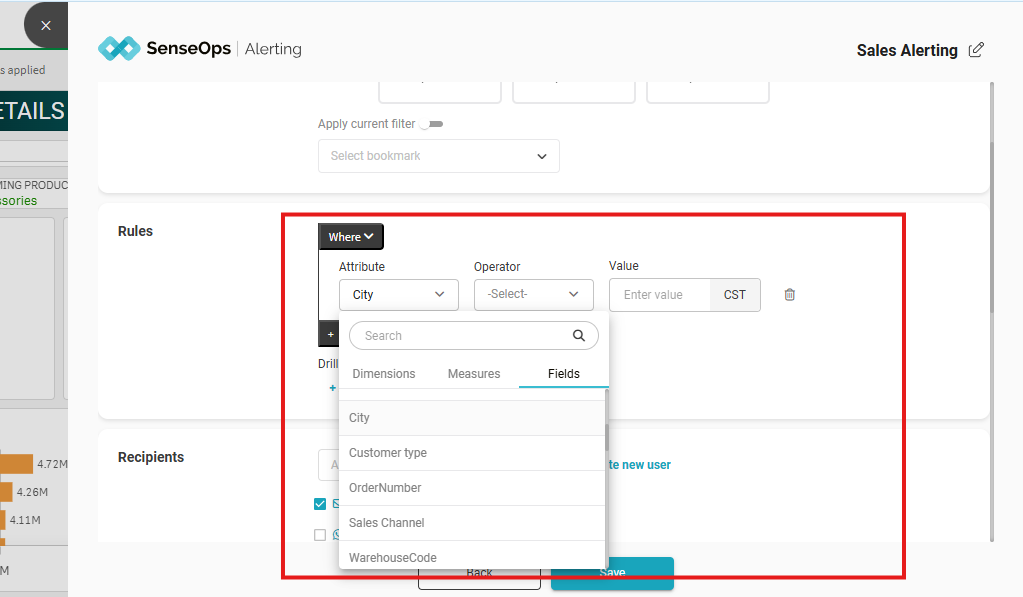
Step 7: To add rules to the alert, click on (+) Add rules and specify the condition for the alert.

Adding recipents
Step 8: To add recipients, click on Add Recipients. If recipients are already created, they will appear in the list.

Creating recipent from creation pop-up
- To create a new recipient, click on + Create new user. A pop-up titled Create contact will appear. Fill in the user's details and click Save to add the contact.

Attachment Options in SenseOps Qlik Sense Alerting
Step 9: Choose the media channels through which the alert will be sent (Email and WhatsApp). User can compose the message for the recipient and select the file attachments (Image, PDF, or Excel).
Tip
User can select multiple media channels and file formats if needed.

- By default Email will be selected. You can select WhatsApp or Teams also to send the alert to recipients.
Note
Only after configuration of Email,WhatsApp and Teams, you can use media channels for sending Alert.
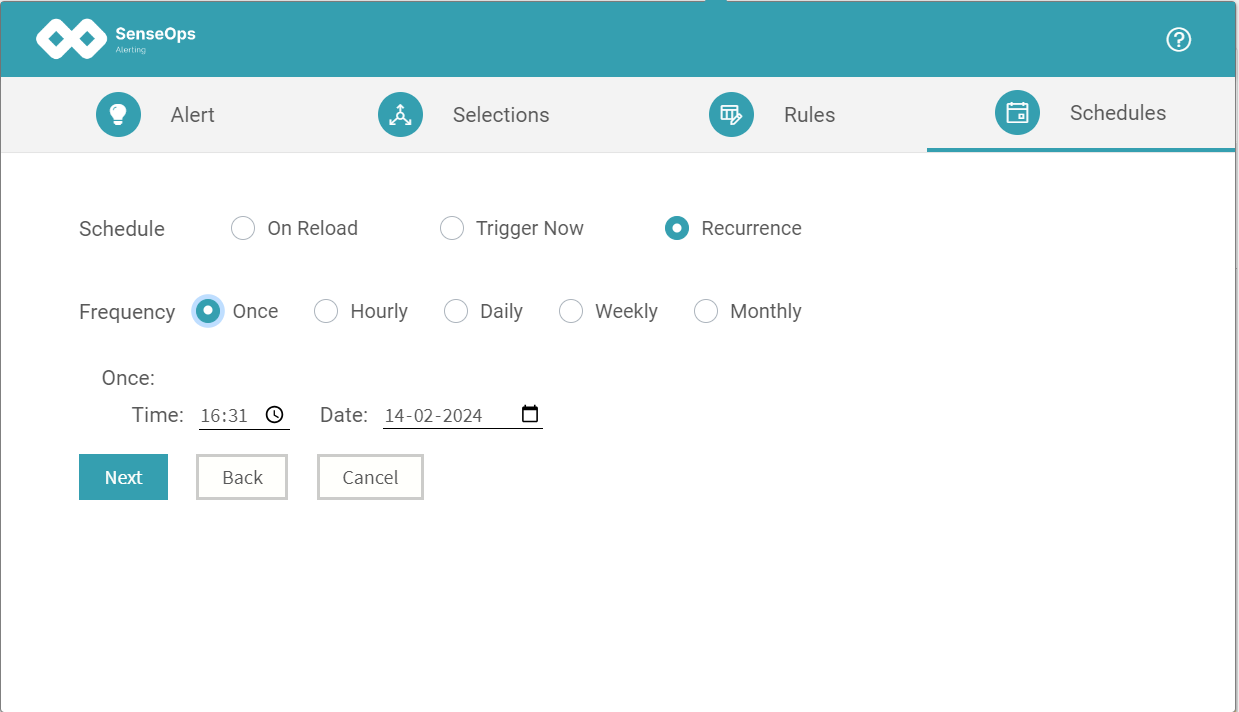
Scheduling Qlik Sense Alerts in SenseOps
Step 10: You can set up one of the following types of schedules:
- On app reload: The alert will be sent to the recipient each time the app is reloaded.

- Trigger now: The alert will be sent immediately when the Trigger button is clicked in the main Alerting pop-up.

- Schedule: You can schedule the alert to be sent at specific times (hourly, daily, weekly, or monthly) by setting start and end dates with corresponding times.
Step 11: After configuring the alert, review the settings and click Save. A confirmation message "Alert Saved Successfully" will appear at the bottom-left corner.

Ready to send Alert
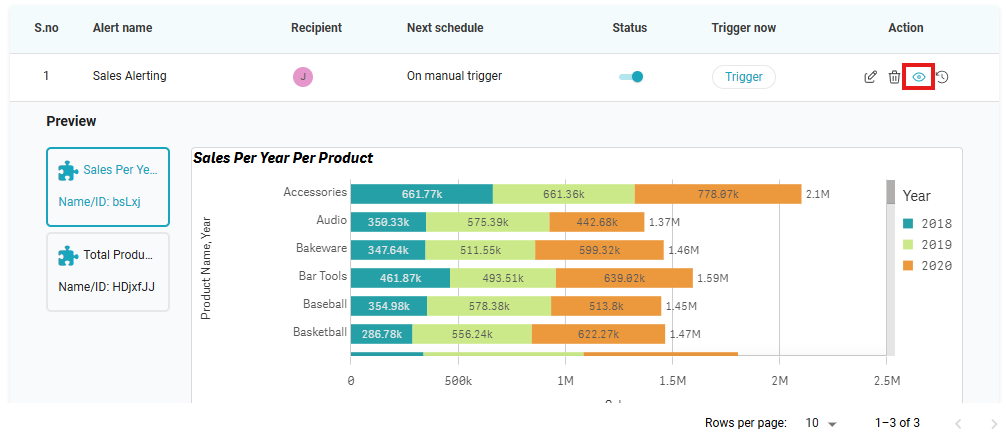
- After saving, the alert will be listed in the slider, showing the following details: S.No, Alert Name, Recipient, Next Schedule, Status, Trigger Now, and Action. Click Trigger to send the alert to the recipient.

-
You have multiple actions available such as edit, delete, preview and history.
-
Click "Eye" option to preview the charts added to the alert before triggering it.
- Click "history" option to see the history of a specific Alert and also you can see the status breakdown of the Alert.

Contacts
- Navigate to the main Qlik Sense Alerting pop-up and click the settings icon in the top-right corner. From the options, select Contacts to view contacts page.

- In the Contacts page, click on Create Contact in the top-right corner. Fill in the contact details and click Save to add the new contact. These contacts can be used to assign alerts or notifications within Qlik Sense Alerting via SenseOps.

Properties of Alerting Icon
| Settings | Functionality |
|---|---|
| Button label | Allows users to add a label for the Alerting button. |
| Show as button | Enables the display of the Alerting button inside the sheet or selection menu. |
| Tooltip text | Allows users to add a tooltip to the Alerting button. |
| Button size | Customizes the size of the Alerting button. |
| Tooltip Text | Enables fixed or auto tooltip mode for the Alerting button. |
| Padding | Adjusts padding around the Alerting button. |
| Custom fonts | Customizes the font color, family, and style for the Alerting button. |
| Background layout | Allows users to set a background color for the Alerting button. |
| Button Icon | Enables or disables the icon in the Alerting button. |
| Custom Icon | Allows users to select an icon based on the sheet for the Alerting button. |
| Show as image | Provides the option to show or hide the icon within the Alerting button. |
| Icon custom | Enables customization of the icon's color, size, and position in the Alerting button. |
| Border custom | Allows users to define the border radius, width, and color for the Alerting button. |
| Enable Shadow | Allows users to apply a shadow (box-shadow or drop-shadow) to the Alerting button. |
| Layout property | Customizes the background color of the Alerting button layout. |